Wednesday, November 27, 2013

A Tilda Birthday Card

At our house on Thanksgiving, we celebrate the holiday and my Granddaughter's birthday. It is all the more special, as she is a delightful and very special girl. This year she is 13 years old and a teenager. This lovely girl is no longer little and this grandma is a bit sad about that. Not only is she a straight "A" student but she is an accomplished dancer, performing with her dance studio's competition team. She and the team have won many awards, but last season was especially great as my granddaughter won the championship for her first solo performance. This year she has many dances to do, as well as two solos! We will be looking forward to going to her local competitions!

Here is the card I made especially for my granddaughter:


I bought this mini Tilda dancer in honor of my granddaughter. It is my first of what has become an ongoing collection. She is colored with Prismacolor pencils and mineral spirits. I cut her out and placed her on a doily heart. It gives the look of angle wings behind the dancer! The card base is a powder blue and two small crystals embellish the upper right corner of the card.
A card just right for a dancer!

A new necklace for her birthday.

Grandma Carla designed the wooden cigar box for her lovely Granddaughter. The small carved box was from an estate. sale.
 This card is entered on the Magnolia-licious Challenge Blog:
 http://www.magnolia-liciouschallengeblog.blogspot.com/

Wednesday, November 20, 2013

Santa Window Card


This is one of my favorite Christmas cards and yes, I showed it to you in July. It's such an adorable Christmas card. Come back next week and I will show you how to use the Santa (U1792) back n front stamps by Art Impressions Stamp Co. for another darling card. I will be showing you cards to make for the holidays up until Christmas, so come back often. 

Supply List:
Christmas with Presents stamp (OR1059) by Stampabilities
Santa (U1792) back n front stamps by Art Impressions Stamp Co.
Small Madison Window die by Poppystamps, Inc.
Ranger Jet black Archival Ink Pad
Inktensive pencils by Derwent or use an other coloring medium
Water brush
Cuttlebug
Martha Stewart edge punch Drippy Goo
Glitter Paper
Watercolor Paper 140 lb.
Card Base
Glue
Gold Metallic Gelly Roll Pen
White Med. Gelly Roll Pen
Pear Fabric Paint by Tulip
Stickles Glitter Glue

Stamp Santa front and back
Color Santa with Inktense pencils or other medium
Damp brush Santa and let dry. Blend red and orange with water for skin tone.

Use Stickles on clothing trim and let dry.
Use white Gelly Roll Pen to color eyebrows.
Use Pearl Tulip Fabric Paint for dimension on hair and beard and let dry.
Cut out Santa's two parts.
Two sides of Santa glued.
Stamp tree near the far edge inside of card.
Color tree.
Next, Cut the Window using the Small Madison Window die with the Cuttlebug or other die cutting machine.

Position the window frame in the area to be cut from the base card.
Make the window frame cut slightly larger than the window frame.

 Glue window frame to cut on the outside and match the second window frame on the inside.

 Cut icicles with the Martha Stewart Punch.
Cut  icicles to fit window frame top and bottom and glue.
 Glue Santa to front of card looking into the window.
Santa should be looking into the window at the tree.


Monday, November 11, 2013

Watercolor Scenic Art Cards

I'm really loving my new Art Impressions rubber stamps. The stamps combined with my Marvy watercolor markers, 140 lb. cold press watercolor paper, water container, paper towel, waterbrush, liquid mask, pink eraser, plastic palette, help me to create gorgeous frameable art cards.

When using watercolor markers for scenic art the basic idea is to color on the back of the stamp with the marker ad stamp on the paper. Then using a damp waterbrush to "pull" out the color. That is followed by adding color off the palette with the brush and adding details. You can continue to add more stamping in the same way.

When you leave white areas, it creates highlights and and gives form to the shapes.

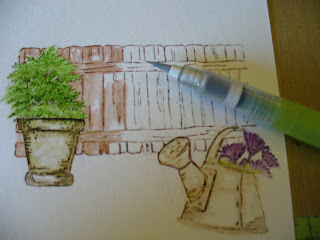
I use liquid mask as a resist when I want images to appear to have been stamped "behind" other images. This creates an element of depth to the work. So in the case of my fence behind the flower pot and the watering can, these were stamped and waterbrushed. When these are dry, I soaped (easier to get the masking liquid off the brush) brush and dipped it into the mask. I brush the mask over my painted images (careful not to smear my images), let it dry and then stamped my fence where I wanted it.


I pulled out my color from the fence and let that dry. I use my pink eraser and my fingers to remove the dried liquid mask. Now although the fence was stamped over, it looks in back of the pot and can!


After adding more details with the stamps, markers and waterbrush, I trim the work to fit the front of my base card and adhered it.


Another way the have images appear to be behind another images is to cover the original images with a sheet of paper and print slightly over it.


I'm so pleased with each of my cards and look forward to making more with Art Impression stamps.
Art Impressions Stamps used:
Cottage - M2425
Fence - UMP1499
There is so much that can be done with these wonderful versatile stamps.
Wooden Cart - P-1959
Wooden Barrel - F-1730
Wooden Stand - P-1705
Flower Pot - Stamp Set UM3521
Gate - Stamp Set UM3521
Tiny Grass - Stamp Set UM3521
Watering Can - Stamp Set UM3521
Leaves -  Stamp Set UM3521
Ivy Vine -  Stamp Set UM3521


This is one of my favorite cards, it used all art Impression stamps and shows so much depth. It has inspired me to combine many of my stamp to create lovely scenes.
These stamps and this blog post was submitted to Just Cards Magazine.